Showing posts with label Oracle. Show all posts

Thursday, February 27, 2014

Database UpGrade ("DBUA")

Upgrading a database is one of the reponsibilities of a database administrator (DBA). In most open source databases, it is much easier to upgrade the database whether you're a DBA, Developer or System Administrator. In Oracle, however, the process is somehow different. It is much more complex involving different steps.

In this post, we will look out the easy method of upgrading a database from one version to another higher version. I am using 11.2.0.3.0 to 11.2.0.4.0

In Oracle 11g, database upgrade can be invoked using the "DBUA" - an acronym for Oracle Database Upgrade Assistant.

Patch versus Upgrade
What is a Patch? How is this different from an upgrade?
Take note that an Oracle Patch is more of an update for newer security and performance fixes whereas upgrade is a total reconfiguring of the database or software version. You can login into Oracle Support with your userid and identifier to download an Oracle Patch.

Oracle version numbering
11.2.0.4.0 is the most current upgrade available for Oracle 11g to date. The "11" stands for the database version number, "2" is the release number, "0" is application release number, "4" is the component release number, which is the main upgrade we are interested in. The last "0" is the platform specific number. You can update this with Opatch. See Oracle documentation on this topic here: Identifying Your Oracle Database Software Release

Upgrading Database from 11.2.0.3.0 to 11.2.0.4.0

Please follow this easy steps to upgrade your database to 11.2.0.4:

1. Make sure you have installed the 11.2.0.4.0 full installation with a new ORACLE_HOME. This is a full installation
2. Take backup of database
3. Export new ORACLE_HOME and adjust /home/oracle/.bash_profile
6. Open a terminal and run "DBUA" to upgrade database

PLEASE NOTE

To upgrade a database, the database must be in "Open" mode before you start. If your database is in "mount" or "nomount" state, you will run into this error.


You have to start your database and ensure that it is open before you continue.


Launch the "DBUA" from the terminal


Choose the right database you want to upgrade. In this example, I have more than one databases with version 11.2.0.3.0. I chose the last one.


Confirm the operation. Click "Yes"


Here you can choose the "Paralellism" for the process. This implies the speed to accomplish this upgrade process.


Here is an opportunity to migrate the datafiles from their present location to a new one. DBUA can do this for you during the upgrade. Remember that almost all database settings can be adjusted during an upgrade. You can also let DBUA take a backup of the database for you before the upgrade.


Please "Browse" to select the right directory to move the datafiles to. If you do not want to move datafile to a new location, simply ignore this step.

 
 Change the size of the Fast Recovery Area (FRA). This size will control the backup repository. If you miss this setting, you will have to change the setting after the database has been upgraded by using the "Alter System Set" command.


This screen shows a summary of the Database Upgrade options selected before the process is started. You can still make adjustments by clicking the "Back" button. At this stage, you want to verify the Database name, version and ORACLE_HOME.

 
Click on "Next" and the process will start

 
Wait for the process to complete. Once the process completes 100%, you will click "Ok"

 
This is the feedback page. Here you need to verify that the upgrade has been done.
If for any reason you need to rollback the upgrade process, click on "Restore Setting Only".
If you need to change passwords, click on "Configure Database Password"
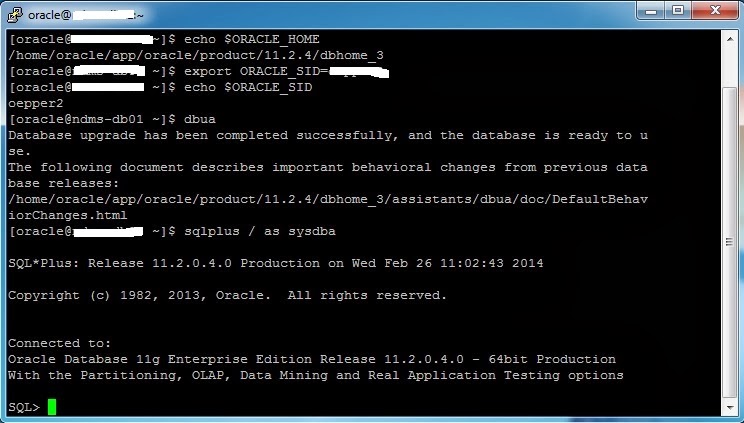

 
Here you log in to verify the version. In addition to the command shown in the image, you can also run this command:

SELECT  *  FROM PRODUCT_COMPONENT_VERSION;

PRODUCT                                                 VERSION     STATUS
-------------------------------------------------------- ----------- -----------
NLSRTL                                                       11.2.0.4.0  Production
Oracle Database 10g Enterprise Edition       11.2.0.4.0  Prod
PL/SQL                                                         11.2.0.4.0  Production

Thanks for reading!


Wednesday, August 14, 2013

Encrypting RMAN backup

Configuring encryption for Oracle Recovery Manager (RMAN) is always a good step in the right direction. There may be different reasons for encrypting RMAN backup.
  •  For greater security of data;
  • Customer requirement (e.g, most companies requires encryption for any database file containing SSN, Credit Card number, date of birth, etc); or
  • Complying with laws or regulations.
 
Option 1: Use global security wallet to encrypt backup

*configure the encryption wallet.

create a directory called "Wallet" in $ORACLE_BASE/admin/$ORACLE_SID

mkdir /home/oracle/app/oracle/admin/orcl/wallet
*Issue this command as SYS:
SQL> alter system set encryption key identified by "oracle1";
*Open the wallet:

SQL> alter system open encryption wallet identified by "oracle1";
*Log in to rman to encrypt backup

rman target /

RMAN> configure encryption for database on;

RMAN> backup database;


Option 2: Configure encryption right from RMAN

Another option is to configure encryption right from RMAN. You can also decide to use both options 1 and 2 together for double protection. Option one will be global because it controls every encryption done on the database including the backup. Option 2 is only restricted to RMAN prompt alone.

*Log in to RMAN and configure Encryption

RMAN target /

RMAN> set encryption on identified by "oracle1" only;

RMAN> backup database;

Note: You don't need a wallet to implement this. You can combine this with the global wallet transparent backup if you like. That will give you dual protection
You need to specify this password during recovery
  
Removing encryption
 
RMAN> configure encryption for database off;

Note: You need to set encryption off if at any point you don't need to encrypt your backup again. Some organizations will require you to remove encryption for data or databases that are only for TEST or DEVELOPMENT purpose.

Query encryption setting

Oracle provided a view to track encryption setting configured for recovery manager (RMAN). Issue this command as SYS:

select * from V$RMAN_ENCRYPTION_ALGORITHMS;

This is the view with all the details of rman encryption modes in the database. It is essential for a DBA to understand the encryption mode and their restrictions/limitations.

Thank you for reading.

Monday, July 8, 2013

Using SQLloader on Oracle 11g

I taught a session on SQLloader over the weekend, so I am going to post the highlights and the exercises I created for the students on this space.

What is Sqlloader?

It is a database tool for loading large volumes of data into the database. It is faster than using an insert and more reliable too. Also, it is free because it comes with the Oracle database utilities.

How to invoke Sqlloader

Lauch sqlloader using the command below:

sqlldr username/password control=controlfile

e.g

sqlldr system/**** control=my_control_file.ctl


Valid Keywords/arguments

    userid --     ORACLE username/password
   control --     control file name
       log --       log file name
       bad --      bad file name
      data --      data file name
   discard --    discard file name
discardmax -- number of discards to allow          (Default all)
      skip --      number of logical records to skip    (Default 0)
      load --      number of logical records to load    (Default all)
    errors --     number of errors to allow            (Default 50)
      rows --     number of rows in conventional path bind array or between direct path data saves
                      (Default: Conventional path 64, Direct path all)
  bindsize --   size of conventional path bind array in bytes  (Default 256000)
    silent --      suppress messages during run (header, errors, discards, partitions)
    direct --      use direct path                      (Default FALSE)
   parfile --      parameter file: name of file that contains parameter specifications


example 1: Use sqlloader to load data into table PERSON

log in as SYSTEM

SQL> create table PERSON
(SSN number(15),
National_ID number(15),
Last_name varchar2(30),
first_name varchar2(15),
sex char(1)
);

create a control file- "person_ctl.txt"

add this.....

LOAD DATA
  INFILE 'c:\person_data.txt'
  BADFILE 'c:\person_data_bad.txt'
  APPEND
  INTO TABLE PERSON
  FIELDS TERMINATED BY ","
  TRAILING NULLCOLS
( SSN,
National_ID,
Last_name,
first_name,
sex 
)

create an infile- "person_data.txt"

add this.....

77770101,7777801,JEFFEREY,KIDMAN,m
77770102,7777802,Clinton R,miller,m
77770103,7777803,ALLEN D,IVES,m
77770104,7777804,Matthew,MAXWELL,f
77770105,7777805,ANTHONY J,REISNER,m
77770106,7777806,CLINT A,KOCH,m
77770107,7777807,ORLANDO,Desantis,m
77770108,7777808,JUAN C,ZIMMERMAN,m
77770109,7777809,STEVE J,EVANS,m
77770110,7777810,Robert D,DAVIS,m
77770111,7777811,Michael,McClendon,m
77770112,7777812,JONATHAN,CONGER,m
77770113,7777813,DAVID F,LOVITT,m
77770114,7777814,Ernesto,FLESHMAN,m
77770115,7777815,Joshua B,pierce,m
77770116,7777816,Justin,OLIVER,m
77770117,7777817,TODD J,Jacobs,m
77770118,7777818,Conner,BROWN,m
77770119,7777819,Dewey,WOOD,m
77770120,7777820,FRANK C,ARAUJO,m
77770121,7777821,SCOTT A,OBYRNE,m
77770122,7777822,JESSE W,HARDIN,m
77770123,7777823,MATTHEW D,CASTOR,m
77770124,7777824,JOSHUA,ANDREWS,m
77770125,7777825,JUSTIN B,Depew,m
77770126,7777826,MATTHEW F,FORST,m
77770127,7777827,ALFONSO L,OGBORN,m
77770128,7777828,COREY J,DINOFF,m
77770129,7777829,CHRISTOPHER J,COMETA,m
77770130,7777830,PEDRO L,WEBB,m
77770131,7777831,ZACHERY R,GUTIERREZ,m
77770132,7777832,George,SAIKU,m
77770133,7777833,WILLIAM P,FISHER,m
77770134,7777834,ANTHONY R,STOWBUNKO,m
77770135,7777835,Terry,GILCHRIST,m
77770136,7777836,ERIC M,LEE,m
77770137,7777837,CHARLES W,MONTGOMERY,m
77770138,7777838,CHRISTOPHER S,SZOKE,m
77770139,7777839,RANDALL J,Konig,m
77770140,7777840,Robert E,TURNBOW,m
77770141,7777841,JUSTIN R,GUTIERREZ,m
77770142,7777842,NICHOLAS P,klein,m
77770143,7777843,ROBERT W,ALLEY,m
77770144,7777844,PAUL D,SANTOCONO,m
77770145,7777845,KORY J,GOMEZ,m
77770146,7777846,WALTER T,STEADMAN,m
77770147,7777847,JOSHUA D,Martin,m
77770148,7777848,CHAN P,GWIZDAK,m
77770149,7777849,CHRISTOPHER W,OKKEN,m
77770150,7777850,NAQUAN D,CARMICHAEL,m


Launch sqlloader from c:\


c:\> sqlldr system/**** control=person_ctl.txt


example 2: Use sqlloader to load data into table SCHOOL

log in as SYSTEM

SQL> create table SCHOOL
(SCH_ID number(15),
SSN number(15),
state_id number(7),
county_id number(7),
county number(7),
state char(2)
);

create a control file- "sch_ctl.txt"

add this.....

LOAD DATA
  INFILE 'c:\sch_data.txt'
  BADFILE 'c:\sch_data_bad.txt'
  APPEND
  INTO TABLE PERSON
  FIELDS TERMINATED BY ","
  TRAILING NULLCOLS
( SCH_ID,
SSN,
state_id,
county_id,
county,
state
)

create an infile- "sch_data.txt"

add this.....

7777801,77770101,262,2020,2020,ga
7777802,77770102,262,2020,2020,ma
7777803,77770103,262,2020,2020,la
7777804,77770104,262,2020,2020,tx
7777805,77770105,262,2020,2020,md
7777806,77770106,262,2020,2020,mi
7777807,77770107,262,2020,2020,mo
7777808,77770108,262,2020,2020,mo
7777809,77770109,262,2020,2020,mi
7777810,77770110,262,2020,2020,tx
7777811,77770111,262,2020,2020,tx
7777812,77770112,262,2020,2020,tx
7777813,77770113,262,2020,2020,md
7777814,77770114,262,2020,2020,md
7777815,77770115,262,2020,2020,sd
7777816,77770116,262,2020,2020,id
7777817,77770117,262,2020,2020,mi
7777818,77770118,262,2020,2020,dc
7777819,77770119,262,2020,2020,dc
7777820,77770120,262,2020,2020,dc
7777821,77770121,262,2020,2020,dc
7777822,77770122,262,2020,2020,dc
7777823,77770123,262,2020,2020,dc
7777824,77770124,262,2020,2020,mi
7777825,77770125,262,2020,2020,dc
7777826,77770126,262,2020,2020,md
7777827,77770127,262,2020,2020,ms
7777828,77770128,262,2020,2020,tn
7777829,77770129,262,2020,2020,tx
7777830,77770130,262,2020,2020,oh
7777831,77770131,262,2020,2020,mi
7777832,77770132,262,2020,2020,az
7777833,77770133,262,2020,2020,ca
7777834,77770134,262,2020,2020,oh
7777835,77770135,262,2020,2020,ga
7777836,77770136,262,2020,2020,ny
7777837,77770137,262,2020,2020,ny
7777838,77770138,262,2020,2020,nj
7777839,77770139,262,2020,2020,nj
7777840,77770140,262,2020,2020,pa


Launch sqlloader from c:\


c:\> sqlldr system/**** control=sch_ctl.txt

NOTE:

To avoid errors, launch SQLldr from the path where your control file is located,
e.g if your control file is c:\database\control1.ctl, then run sqlldr from 'c:\database'

Monday, July 1, 2013

Datapump in Oracle 11g

Datapump import/export are used for data migration. You can export TABLES, SCHEMA, TABLESPACE or DATABASE and restore it on another server.

Quickfacts:

1. Datapump produces a dumpfile with extention .dmp or .imp
2. Privilege 'exp_full_database' is required to export full database
3. Privilege 'imp_full_database' is required to impport full database
4. In datapump, you can user a parfile to store your commands

Getting the help page

expdp help=y

Keyword                                  Description
------------------------------------------------------------------------------
DIRECTORY                          Directory object to be used for dumpfiles and logfiles.
DUMPFILE                             List of destination dump files (expdat.dmp),
                                                 e.g. DUMPFILE=scott1.dmp, scott2.dmp, dmpdir:scott3.dmp.
EXCLUDE                              Exclude specific object types, e.g. EXCLUDE=TABLE:EMP.
FULL                                       Export entire database (N).
HELP                                       Display Help messages (N).
INCLUDE                                Include specific object types, e.g. INCLUDE=TABLE_DATA.
JOB_NAME                            Name of export job to create.
LOGFILE                                 Log file name (export.log).
NETWORK_LINK                  Name of remote database link to the source system.
NOLOGFILE                           Do not write logfile (N).
PARALLEL                             Change the number of active workers for current job.
PARFILE                                 Specify parameter file.
SCHEMAS                              List of schemas to export (login schema).
TABLES                                  Identifies a list of tables to export - one schema only.
TABLESPACES                     Identifies a list of tablespaces to export.
VERSION                              Version of objects to export where valid keywords are:
                                                (COMPATIBLE), LATEST, or any valid database version.
EXPORT

Example 1: Joe is a user on a database, Joe needs to export the whole database.
Solution:
c:\> sqlplus sys/**** as sysdba
     grant exp_full_database to joe;
     commit;
     exit;
c:\> expdp joe/**** full=y dumpfile=joe_database.dmp logfile=joe.log compression=n

^full database is exported
^Dumpfile will be created in the default location, which is 'c:\app\user\admin\orcl\dpdump'


Example 2: System needs to export Joe's schema with compression
Solution:
c:\> expdp system/**** full=n schemas=joe dumpfile=joe_schema.dmp logfile=joe1.log compression=y

^Joe's schema is exported
^Dumpfile will be created in the default location, which is 'c:\app\user\admin\orcl\dpdump'
^Dumpfile will be compressed


Example 3: Joe needs to export 2 tables (Student, Lecturer) to a location on disc ('c:\oracle')
Solution:
c:\> sqlplus joe/****
     create directory oracle as 'c:\oracle';
     commit;
     exit;
c:\> expdp joe/**** full=n tables=Student,Lecturer directory=oracle dumpfile=joe_tables.dmp logfile=joe2.log

^Joe's table are exported
^Dumpfile will be created in 'c:\oracle'
^There should be no space between the tables...e.g tables=(student1,student2,student3)


IMPORT

Example 4: Joe needs to import 2 tables (Student, Lecturer) from a directory called 'oracle'
Solution:
c:\> impdp joe/**** directory=oracle dumpfile=joe_tables.dmp tables=Student,Lecturer logfile=joe3.log

^Joe's table will be imported

Example 5: Joe needs to import 2 tables (Student, Lecturer) and change the tables name to 'student1' and 'student2'
Solution:
c:\> impdp joe/**** directory=oracle dumpfile=joe_tables.dmp logfile=joe3.log remap_table=joe.Student:student1,joe.Lecturer:student2

^Joe's table will be imported and renamed
^Tables must be separated by comma, the colon (:) must separate the oldname and new name


Example 6: System needs to import the whole database from a dumpfile on a flashdrive
Solution:
c:\> cd c:\app\user\admin\orcl\dpdump
Copy dumpfile to the folder
Launch impdp from this location
c:\app\user\admin\orcl\dpdump> impdp system/**** full=y dumpfile=database.dmp logfile=db.log

Example 7: System needs to import joe's schema from dumpfile (of full database) on a flashdrive
Solution:
c:\> cd c:\app\user\admin\orcl\dpdump
Copy dumpfile to the folder
Launch impdp from this location
c:\app\user\admin\orcl\dpdump> impdp system/**** full=n schemas=joe dumpfile=database.dmp logfile=db1.log

^Joe's schema will be imported


Example 8: System needs to import joe's schema and change name to DANIEL and also change the tablespace to daniel's tablespace
from dumpfile (of full database) on a flashdrive
Solution:
c:\> cd c:\app\user\admin\orcl\dpdump
Copy dumpfile to the folder
Launch impdp from this location
c:\app\user\admin\orcl\dpdump> impdp system/**** full=n dumpfile=database.dmp logfile=db2.log remap_schema=joe:daniel remap_tablespace=users:daniel_tbs

^Joe's schema will be imported and changed to Daniel
^Tablespace will be changed from users to Daniel_tbs
^you MUST physically create this tablespace and grant access to Daniel.


Example 9: System needs to import joe's schema using a parameter file
Solution:

create a parfile called 'joe.txt'

USERNAME=system/****
FULL=N
SCHEMA=(joe,daniel,class)
DIRECTORY=oracle
DUMPFILE=database.dmp
LOGFILE=db4.log


Save file and exit

c:\> impdp parfile=joe.txt

Parfile makes it more convenient to adjust datapump commands. It also help when you need to constantly run same commands.

Example 10: System needs to import joe's schema from dumpfile and replace all tables
Solution:
c:\> impdp system/**** full=n schemas=joe dumpfile=database.dmp logfile=db6.log table_exists_action=replace

^Joe's schema will be imported
^Joe's tables will be replaced if they already exist on the database prior to import

Wednesday, June 12, 2013

ORA-24247: network access denied by access control list (ACL) 

Error likes "*Cause: The UTL_HTTP package failed to execute the HTTP request" are very common with Oracle 11g and older versions of Oracle database. The problem is that PL/SQL packages: UTL_TCP, UTL_HTTP, UTL_SMTP, UTL_MAIL, and UTL_INADDR cannot be executed by the current user. 


Applications rely on database schemas to execute functions. For example, using internet maps to determine location in an application requires an external connection to another webpage. This is why the invoker of those packages needs additional privileges to connect to an external host or to resolve the name or the IP address of a host. 

This is how the process works: The packages check the invoker for the necessary privileges only when the calls are made at runtime and raises an exception if the invoker lacks the privileges. 

In Oracle 11.2.0.3.6, this problem was solved. Prior releases of Oracle requires XML DB to be installed and Configured a network Access Control Lists (ACLs) in the database before these packages can work.

What is an ACL? An ACL is a network access control list that enables a DBA control access to external connection through the host. Using an ACL is common in production databases when issues with Network Access like ORA-24247 arises.


Environment
Linux 5.4
Oracle 11.2.0.3.0 (Production)

Cause
Privilege to UTL_http  should have been granted to specific user or schema that will be using the external connection. Though this can be given through patches/updates, it is highly recommended to reduce host vulnerability to manually assign privilege through ACL.
If schema has access to objects after Oracle patch was installed, this is/could be a problem when installed on the production server because accounts that should not have access to this and other objects will have access to things  they are not supposed to.

Solution
Verify that the Port is open
You need to verify that your port is open and can connect externally and also download webpages. Use these commands:

login as user "Oracle" (OS environment)

wget http://maps.google.com/
or
wget -r -l 0 http://maps.google.com/

If you get a response, then your port is open and ready for connection.

Create the user requiring access
Run these commands to create the users needed:

create tablespace patients 
datafile '/home/oracle/app/oracle/oradata/patients/datafile/patients01.dbf' size 50m reuse autoextend on maxsize unlimited;

create smallfile temporary tablespace patientstemp tempfile '/home/oracle/app/oracle/oradata/patients/datafile/patientstemp01.dbf' size 5m autoextend on next 2048k maxsize 1024m extent management local uniform size 1m;

create user patients profile "default" identified by "patients"
default tablespace patients
temporary tablespace patientstemp
quota unlimited on patients account unlock;

grant create session to patients;
grant connect to patients;
grant create trigger to patients;
grant create view to patients;
grant create procedure to patients;
grant create sequence to patients;
grant create table to patients;
grant create synonym to patients;

Run script to create ACL
The script will first drop any existing ACL before creating a new one. This is necessary to reduce or eliminate conflicts.

begin
        DBMS_NETWORK_ACL_ADMIN.DROP_ACL(acl => 'utl_http.xml');
end;
/
commit;
BEGIN
  DBMS_NETWORK_ACL_ADMIN.CREATE_ACL(acl         => 'utl_http.xml',
                                    description => 'geo code ACL',
                                    principal   => 'PATIENTS',
                                    is_grant    => true,
                                    privilege   => 'connect');
  DBMS_NETWORK_ACL_ADMIN.ADD_PRIVILEGE(acl       => 'utl_http.xml',
                                       principal => 'PATIENTS',
                                       is_grant  => true,
                                       privilege => 'resolve');

  DBMS_NETWORK_ACL_ADMIN.ASSIGN_ACL(acl  => 'utl_http.xml',
                                    host => 'your_ip_address');
END;
/
COMMIT;

Grant access to user
as user "SYS" run this command

grant execute on utl_http to PATIENTS;

grant execute on DBMS_NETWORK_ACL_ADMIN to PATIENTS;

Assign ACL to networks (in this order)

SQL> BEGIN
  DBMS_NETWORK_ACL_ADMIN.ASSIGN_ACL(acl  => 'utl_http.xml', host => 'maps.google.com');
  END;
   /

SQL> BEGIN
 DBMS_NETWORK_ACL_ADMIN.ASSIGN_ACL(acl  => 'utl_http.xml', host => 'local.yahooapis.com');
 END;
  /

Verify the ACL

SELECT acl from dba_network_acl_privileges;
/sys/acls/utl_http.xml

SELECT host, lower_port, upper_port, acl FROM   dba_network_acls;

Desc   dba_network_acls;
 Name                                      Null?    Type
 ----------------------------------------- -------- ----------------------------
 HOST                                      NOT NULL VARCHAR2(1000)
 LOWER_PORT                       NUMBER(5)
 UPPER_PORT                         NUMBER(5)
 ACL                                         VARCHAR2(4000)
 ACLID                                     NOT NULL RAW(16)


Verify permission
Run this script as user "SYS" to verify if the permission to connect externally has been granted to the user - patients:

SELECT acl, principal, privilege, is_grant, 
TO_CHAR(start_date, 'DD-MON-YYYY') AS start_date, TO_CHAR(end_date, 'DD-MON-YYYY') AS end_date FROM   dba_network_acl_privileges;

SQL> SELECT DECODE(
  2  DBMS_NETWORK_ACL_ADMIN.check_privilege('/sys/acls/utl_http.xml', 'PATIENTS', 'connect'),
  3  1, 'GRANTED', 0, 'DENIED', NULL) privilege
  4  from dual;
PRIVILE
-------
GRANTED


Check that it can connect
Run this script as user "SYS" to verify if the permission to connect externally has been granted to the user - patients:

SQL> DECLARE
  2  l_url            VARCHAR2(50) := 'http://maps.google.com';
  3  l_http_request   UTL_HTTP.req;
  4   l_http_response  UTL_HTTP.resp;
  5   BEGIN
  6  l_http_request  := UTL_HTTP.begin_request(l_url);
  7  l_http_response := UTL_HTTP.get_response(l_http_request);
  8  UTL_HTTP.end_response(l_http_response);
  9   END;
10  /

I hope this helps. Please drop your comments or/and questions.

Pix credit: Oracle, NetworkDigest

Thursday, May 23, 2013

RMAN-06169: could not read file header for datafile 7 error reason 9

Error
While attempting to run a backup of the database, we got an error identifying a problem with a datafile. In this post, I will discuss the cause of the problem and how the error was resolved.

rman target sys/****@PUBLIC

Starting backup at 01-APR-13
using channel ORA_DISK_1
RMAN-06169: could not read file header for datafile 7 error reason 9
RMAN-00571: ===========================================================
RMAN-00569: =============== ERROR MESSAGE STACK FOLLOWS ===============
RMAN-00571: ===========================================================
RMAN-03002: failure of backup plus archivelog command at 04/01/2013 15:54:32
RMAN-06056: could not access datafile 7

cause
There is a problem with the datafile 7. It could be due to corruption, or any other problem with the datafile. Oracle will not be able to back up the database except this datafile is restored. Alternative, as a temporary solution, you can skip the datafile in your backup. If the datafile is skipped, RMAN will be able to back up the database but it is not advisable.


solution:

Check the status of the datafile
sqlplus sys/***@PUBLIC

SQL> select file#, status from v$datafile where file# = 7;
FILE# STATUS
---------- -------
7 RECOVER

SQL> select file#, status, enabled from v$datafile where file# = 7;
FILE# STATUS ENABLED
---------- ------- ----------
7 RECOVER READ WRITE
exit;

Restore the datafile from backup
A copy of the datafile in backup can be used to restore the datafile. Simply log back into rman and issue this command:
RMAN> restore datafile 7;
datafile restored

NOTE: You do not need to put your database in mount mode to do this.

Recover the datafile
Recovering a datafile after restore brings it up to date. At this stage, archivelogs and incremental backups will be applied to bring the datafile to the point it was before the problem.

RMAN> recover datafile 7;
starting media recovery
database recovered


For more details on RMAN recovery and restore process, check out Oracle documentations at RMAN

ORA-24247: network access denied by access control list (ACL)

In this post I want to talk about a common error with Oracle 11g, especially 11.2.0.1.0. We were getting this error on all versions of our application after upgrading from 10.2 to 11.2 oracle database on Linux 5.4 64 bit.

ORA-29273: HTTP request failed
ORA-06512: at "SYS.UTL_HTTP", line 1722
ORA-24247: network access denied by access control list (ACL)

Details

This problem is bug 13375884 associated with 11g databases but corrected in latest patch sets. Don't panic! Just follow instructions.

cause

The problem is common to Oracle 11g because prior to 11gR1, you can run PL/SQL code making calls to Oracle Supplied Packages without error. These packages include:

•UTL_TCP
•UTL_HTTP
•UTL_SMTP
•UTL_MAIL

However, after upgrading to a 11g version, this error comes because of inaccessible external network privilege for users calling the packages.

In 11gR1 the Oracle Database enhanced the level of security when users attempt to access External Network Services by implementing Access Control Lists (ACL) using the new DBMS_NETWORK_ACL_ADMIN package. The PL/SQL packages listed above were affected. For more information on this change to Oracle Database Security please review Oracle documentation.


see Oracle documentation on Fine Grain access control at ACL.

Temporary fix

To resolve this issue temporarily, run this script to grant privilege to the user so that the user can access external network service.

BEGIN

-- Only uncomment the following line if ACL "network_services.xml" has already been created
--DBMS_NETWORK_ACL_ADMIN.DROP_ACL('network_services.xml');

DBMS_NETWORK_ACL_ADMIN.CREATE_ACL(
acl => 'network_services.xml',
description => 'NETWORK ACL',
principal => 'QUEEN',
is_grant => true,
privilege => 'connect');

DBMS_NETWORK_ACL_ADMIN.ADD_PRIVILEGE(
acl => 'network_services.xml',
principal => 'QUEEN',
is_grant => true,
privilege => 'resolve');

DBMS_NETWORK_ACL_ADMIN.ASSIGN_ACL(
acl => 'network_services.xml',
host => '*');

COMMIT;

END;


permanent fix

Apply patch 11.2.0.3.0 or later to permanently resolve this network issue.

1. Download the patchset from Oracle Metalink. The detail is "Patch 10404530: 11.2.0.3.0 PATCH SET FOR ORACLE DATABASE SERVER"

2. unzip the software

3. run Installer

4. Run DBUA to configure database to higher version


More on this later.

Friday, March 8, 2013

TEMPFILE ERROR ON ORACLE 10r2/LINUX

Hi folks. Here is one of the errors you can encounter on your job as a Database Java1istrator.
I was running a full export of a database (software) and I ran into this error. I hope sharing this error and the solution will help someone out there.

Environment
Linux 4.9
Oracle 10.2
Database name: software


Error
Linux Error: 2: No such file or directory
Additional information: 3

ORA-06512: at "SYS.DBMS_SYS_ERROR", line 105
ORA-06512: at "SYS.KUPW$WORKER", line 6234
----- PL/SQL Call Stack -----
object line object
handle number name
0x34ec54e8 14916 package body SYS.KUPW$WORKER
0x34ec54e8 6293 package body SYS.KUPW$WORKER
0x34ec54e8 2339 package body SYS.KUPW$WORKER
0x34ec54e8 6854 package body SYS.KUPW$WORKER
0x34ec54e8 1259 package body SYS.KUPW$WORKER
0x5803b23c 2 anonymous block
Job "SYSTEM"."SYS_EXPORT_FULL_06" stopped due to fatal error at 18:54:47


[oracle@software ~]$ sqlplus / as sysdba
SQL*Plus: Release 10.2.0.3.0 - Production on Wed Dec 26 18:58:12 2012
Copyright (c) 1982, 2006, Oracle. All Rights Reserved.

Connected to:
Oracle Database 10g Release 10.2.0.3.0 - Production

SQL> desc v$tempfile
Name Null? Type
----------------------------------------- -------- ----------------------------
FILE# NUMBER
CREATION_CHANGE# NUMBER
CREATION_TIME DATE
TS# NUMBER
RFILE# NUMBER
STATUS VARCHAR2(7)
ENABLED VARCHAR2(10)
BYTES NUMBER
BLOCKS NUMBER
CREATE_BYTES NUMBER
BLOCK_SIZE NUMBER
NAME VARCHAR2(513)

SQL> select name, status from v$tempfile;

NAME STATUS
-------------------------------------
/u10/oradata/software/temp01.dbf ONLINE

/u10/oradata/software/java1temp01.dbf ONLINE

/u10/oradata/software/java2temp01.dbf ONLINE

/u10/oradata/software/java3temp01.dbf ONLINE

4 rows selected.

Here comes the errors . From here you have a clue where the problem is and what you need to do to resolve this issue

SQL> desc dba_tempfile;
ERROR:
ORA-04043: object dba_tempfile does not exist


SQL> desc dba_tempfiles;
ERROR:
ORA-04043: object dba_tempfiles does not exist


SQL> select FILE_NAME, TABLESPACE_NAME from dba_temp_files;
ERROR:
ORA-01116: error in opening database file 204
ORA-01110: data file 204: '/u10/oradata/software/java301.dbf'
ORA-27041: unable to open file
Linux Error: 2: No such file or directory
Additional information: 3
no rows selected

Solution

From this error, you can tell that there is a problem with a tempfle named '/u10/oradata/software/java301.dbf'. What we need to do is figure out how to get that tempfile online and alter the user presently using this tempfile to use the default tempfile from TEMP tablespace.

Crosscheck the default and temporary tablespaces in the database. This will give you an idea of where to go to get the issue resolved

SQL> select tablespace_name from dba_tablespaces;

TABLESPACE_NAME
------------------------------
SYSTEM
UNDOTBS1
SYSAUX
TEMP
USERS
JAVA1
JAVA1TEMP
JAVA2
JAVA2TEMP
JAVA3
JAVA3TEMP


Check for the user(s) presently using the JAVA3TEMP that has issues

SQL> select username from dba_users
2 where temporary_tablespace='JAVA3TEMP';

USERNAME
------------------------------
JAVA3

Change the temporary tablespace of user JAVA3 from JAVA3TEMP to TEMP. This will ensure that the user can use the default temporary tablespace

SQL> alter user JAVA3
2 temporary tablespace TEMP;

User altered.

Check to ensure that the user is properly altered to use TEMP instead of JAVA3TEMP

SQL> select username from dba_users
2 where temporary_tablespace='JAVA3TEMP';

no rows selected

Take the problematic tempfile offline

SQL> alter database tempfile '/u10/oradata/software/java3temp01.dbf' offline;

Database altered.

Please drop a comment if you have any questions. Thanks and watch this space for more posts!

Thursday, February 14, 2013

Oracle user creation and privileges in 10g/11g

Oracle user creation and privileges in 10g/11g

Creating a user and setting privileges for them are common everyday tasks of Oracle DBAs and Developers. You can either do them through the commandline or use client tools, eg. SQL Developer.

creating a default tablespace for the user
Default tablespace is the main tablespace where all the objects of a user reside. A quota has to be set for the user on this tablespace, else oracle will assume the quota is unlimited. Here is the syntax to create a default tablespace for our user:

CREATE TABLESPACE ORACLE_USER
DATAFILE '/home/oracle/app/oracle/oradata/ORACLE_USER/datafile/ORACLE_USER01.dbf' SIZE 50M REUSE AUTOEXTEND ON MAXSIZE UNLIMITED;

creating a temporary tablespace for the user
Temporary tablespace is useful for sorting. Here is the syntax to create a temporary tablespace for our user:

CREATE SMALLFILE TEMPORARY TABLESPACE ORACLE_USERTEMP TEMPFILE '/home/oracle/app/oracle/oradata/ORACLE_USER/datafile/ORACLE_USERtemp01.dbf' SIZE 5M AUTOEXTEND ON NEXT 2048K MAXSIZE 1024M EXTENT MANAGEMENT LOCAL UNIFORM SIZE 1M;

creating the user
When creating the user, these are important options:

"identified by" is used to specify the password of the user
"profile" the resource limits specified for the user. We will look at profile and roles in subsequent postings
"default tablespace" is used to specify where the objects of the user will be kept
"quota" specifies the percentage of the space in the default tablespace that is assigned to the user
"temporary tablespace" is already explained above
""account unlock" specifies the status of the account. If you specify "account lock", the account will be locked and the user will not be able to connect after creation.

CREATE USER ORACLE_USER PROFILE "DEFAULT" IDENTIFIED BY "XXXXX"
DEFAULT TABLESPACE ORACLE_USER
TEMPORARY TABLESPACE ORACLE_USERTEMP
QUOTA UNLIMITED ON ORACLE_USER ACCOUNT UNLOCK;

granting privileges for the user
This gives the user the privilege to access the database. "Create session" must be granted for the user to be able to connect to the database. Other privileges are self-explanatory. Oracle did a good job by using simple English meaning for the database terms.

GRANT CREATE SESSION TO ORACLE_USER;
GRANT CONNECT TO ORACLE_USER;
GRANT CREATE TRIGGER TO ORACLE_USER;
GRANT CREATE VIEW TO ORACLE_USER;
GRANT CREATE PROCEDURE TO ORACLE_USER;
GRANT CREATE SEQUENCE TO ORACLE_USER;
GRANT CREATE TABLE TO ORACLE_USER;
GRANT CREATE SYNONYM TO ORACLE_USER;

checking privileges granted to user
You can query the view "dba_sys_privs" to check the privileges granted to a user at any point in time. Here is an example:

SQL> select privilege from dba_sys_privs
2 where grantee='ORACLE_USER';

PRIVILEGE
----------------------------------------
CREATE TRIGGER
CREATE TABLE
CREATE SEQUENCE
CREATE SYNONYM
CREATE PROCEDURE
CREATE SESSION
CREATE VIEW
7 rows selected.

checking the user's info
You can query the view "dba_users" to check the user's info. For example:

SQL> select username, default_tablespace from dba_users where username='ORACLE_USER';

USERNAME DEFAULT_TABLESPACE
------------------------------ ------------------------------
ORACLE_USER ORACLE_USER

SQL>

dropping a user
You can delete a user by using the syntax:

drop user ORACLE_USER cascade;

This will permanently delete the user and all its objects from the database. It will also purge all the users objects in the recycle bin in Oracle 11g.

Saturday, December 1, 2012

common Oracle DBA interview questions and answer

Here is a small list of questions and answers for junior and mid-level Oracle DBA jobs. Mastery of these questions and answers will help you survive most interview session, and also expose you to some basic and advanced tips you need on the job.

What is the relationship between Control files and V$view?
V$views are kept in the control file. This is why v$ views are always accessible even when the database is in a lesser state.

Can you access V$view while the database is not open?
Yes. V$view can be accessed even when the database is in nomount mode or in a lesser state.

How many stages are involved in getting the database open and running?
3 stages namely: Nomount, Mount and Open stage

What are the Mandatory processes in Oracle?
The processes are the backgound processes. The mandatory ones are Checkpoint, PMON, SMON, Log Writer and Database Writer.

What is an instance?
A combination of memory structure and background processes.

Where can I monitor the Retore job that my colleague did to check if it went well or done properly?
Alert log. Alert log is in background dump. From SQL prompt issue: 'show parameter background dump'

I discovered that my control files are missing, what are my option?
Create another control file from the existing one (multiplex). If there is no existing one, create/build Control file from scratch with a text file. Always back up control file to Trace so that you can have a text file to create a fresh control file.

What is RAC?
Real Application Clusters. A combination of multiple instances accessing a database. The node represents each instance in the cluster.

Why should a client use RAC?
To avoid a single port failure. When there is only one instance, reliability and fault tolerance is low.

What are the demerits of RAC?
It is expensive to maintain. It requires lot of resources (hardware and manpower) as well as maintenance costs. Most firms now use VMware to reduce hardware costs.

What is ASM?
Automatic Storage Management

What would you use ASM?
It is free and more convenient for file management. It helps with load balancing as well as improves reliability and availability.

What is the difference between full and incremental backup?
Full backup is when you backup the whole database and the database is not in open mode. Incremental backup is when you copy the changes that has occured after the last full backup. This is usually done when the database is open and running, and in ARCHIVELOG mode.

Can you use RMAN without database in archivelog mode?
Yes, you can take a cold backup when the database is cleanly shut down.

What is DATAPUMP?
It is a new features that oracle introduced to enhance import and export of database, tablespace, schema and tables. Prior to Datapump, DBAs used regular imp and exp.

What are the basic features that differentiate Datapump from Import and Export?
Datapump allows remaping of database, tablespace, schema and tables. Datapump is also very fast. You can increase parallelism by increasing the workers that will execute the job.
Please note that parallelism is only compatible with Enterprise edition of oracle 10g and 11g.

Best of luck in your interviews and shoot me an email if you have questions.
Cheers!

Saturday, June 2, 2012

Career changer


"Change is the only permanent factor"

Oracle DBA is indeed a career changer. No matter where you are currently in your profession, you can still join the league of high-earners in the Information Technology field. One of the most popular units of the IT field is Database Administration. As a DBA, you will be expected to handle resource or capacity planning, grant user access to the database, manage and repair the database, monitor connections to and secure the database, and also train users. This surely sounds easy but it involves a lot of work.

One of the questions I answer everyday is: "How can I become an Oracle DBA?"

I've answered this question more than 100 times in less than 2 months! This shows that many people are interested in becoming database administrators but do not presently have an idea how they can become one. Becoming a DBA is very simple if you follow the key steps I will provide on this blog. For simplicity of this particular post, I will outline 3 areas you can work on as a 'new-comer' in the DBA field.

1. Attend an Oracle class, or database management seminar;
2. Get obsessed with the field (talk about it);
3. Read independently and practice;
4. Build confidence through networking (with other DBAs); and
5. Get certified.


The essence of this post is not to discuss these steps because it will be exhausting. I will pick these topics one after the other and also bring in writers to contribute.

I believe this blog will help someone out there to change career or build a new career in Database administration. This blog will also serve as an avenue of exchanging ideas with my peers in the field. Just for introduction, my name is Kunle Elebute and I am an Oracle DBA with many years of experience.

Thanks for reading.


MySQL


Acknowledgement: Picture credit to Lenovo
Content: Facet Technical Institute