Thursday, December 26, 2013

Reverse engineer remote Oracle database into Visio

Visio is a tool for ERD or Data Modeling that can be used by DBAs, BA and Developers for modeling, capacity planning and data dictionary management.

With the Reverse Engineer Wizard in Microsoft Visio Professional and Premium editions, you can create a database model from an existing database, whether local or remote. This article will look at a connection to a remote Oracle database through Visio.

Database models graphically show the structure of a database so you can see how database elements, such as tables and views, relate to each other without showing the actual data. This can streamline creating a new database or understanding the structure of an existing one as well as assist developers/DBA with the process of managing or developing data dictionary for their databases.

Here are some of the database objects that Visio can generate through its reverse engineer feature by extracting the codes and properties:
•Tables
•Views
•Primary keys
•Foreign keys
•Indexes
•Triggers (including code)
•Check clauses (including code)
•Stored procedures (including code)


Step 1: Install Oracle 11g Client software on your server.

Download the Client software here
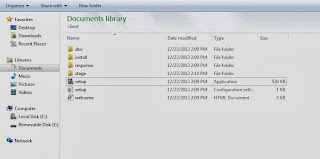

unzip the software

launch the installer by clicking “setup” in the client folder
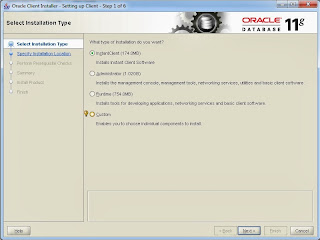


Select the installation mode you desire.


Step 2: Create a Local Service Name for the remote Database.

The next step is to create a Local Service Name (TNSnames.ora) for the remote database you will be connecting into. Oracle uses TNSnames.ora file as a window to connect to the remote server. Consequently, the TNSnames.ora file contains the connection properties like: (1) the remote server name/IP address (2) the SID, service or instance name (3) the port number (4) the protocol for communication with the server.

Launch "NETCA" from the command line to configure TNSnames.ora file
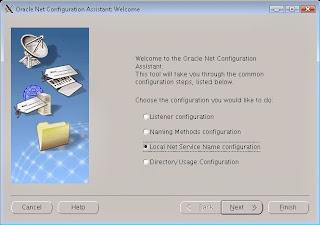

Choose Local Service Name configuration
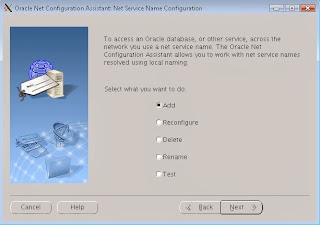

Select "add"
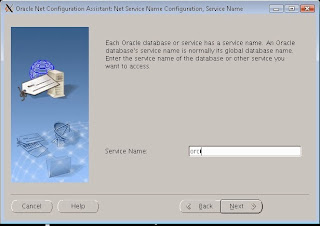

Type in the Oracle SID or service or instance name of the remote database
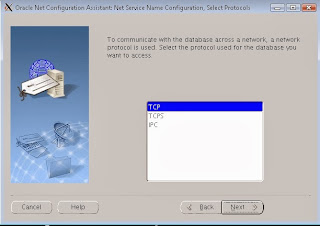

Select the protocol
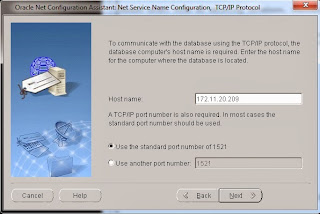

Type in the remote server name or IP address and the port number

To verify that the TNSnames has been correctly configured, from your local machine log in using the network:

sqlplus sys/****@orcl as sysdba

sqlplus system/****@orcl

You should be able to log into the remote database using the above command. If you can't, please repeat step 2 until you can connect.

Step 3: Connect the remote database to Visio.
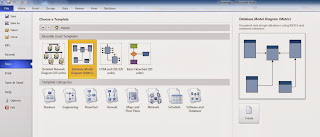

Once you launch Visio, click on "New" and search for "Database Model Diagram"
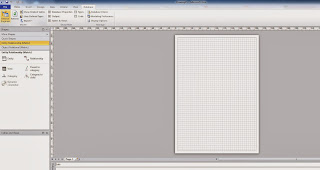

Click on Database menu and "Reverse Engineer"
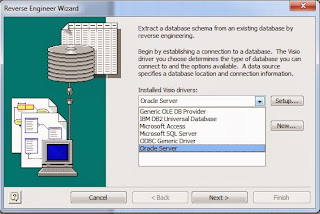

From the list of drivers, choose "Oracle Server"
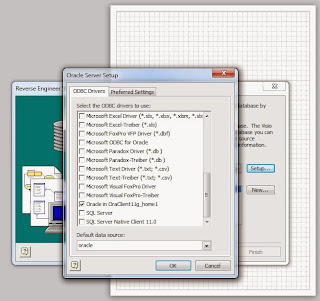

Click on "Setup" and check your "ORACLE_HOME" from the list
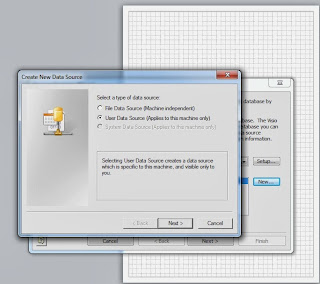

Click on "New" and select user data source
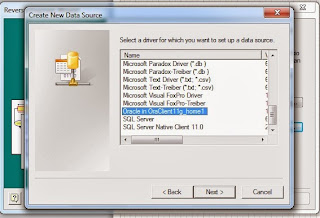

Locate your "ORACLE_HOME" from the list
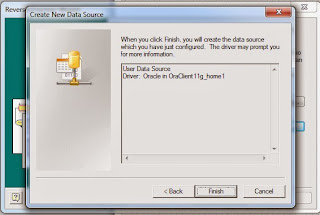

Click "Finish"
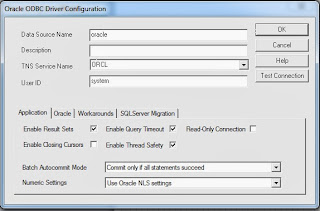

Choose the service name or SID from the list. You should have a dropdown containing the SID you configured. You can also test the connection to the remote server from this point.
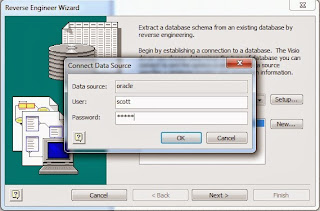

Using the right credential for the remote database, log in with "username" and "password".

You should be able to extract schema objects from your remote database if you follow these steps!

Thanks for reading.


Thursday, October 24, 2013

Database security

Why should a DBA worry about database security? Many DBAs often say that security is not part of a DBA job, but I hold a different view. Security is everybody's job. As a member of a team, you have to play a role in ensuring that data is security. Aside from availability and reliability of data, data must be secured such that unnecessary access is minimized if not completely elimited.

There are different ways of ensuring that database files are secured. We can do this by preventing unwanted access to the database or monitoring the activities of users. Our focus here is on 4 objectives:

• User management;
• Authentication;
• Encryption; and
• Auditing


User management

It is a normal practice to lock any default account in the database that is not being used. Issue this command:

Example 1: Lock the account of a user

Alter user TOMMY account lock;

To unblock the account:
Alter user TOMMY account unlock;


Example 2: change password of a user

To change password:
Password TOMMY;
(enter new password)

To force password to expire:
Alter user TOMMY password expire;


Example 3: change tablespace of a user

To change default tablespace:
Alter user TOMMY default tablespace users;


Example 4: delete a user

To delete user;
Drop user TOMMY cascade;


Example 5: change password of a user to unlimited expiry

SQL> SELECT EXPIRY_DATE, profile, username FROM DBA_USERS WHERE account_status='OPEN';

EXPIRY_DA PROFILE USERNAME
--------- ------------------------------ ------------------------------
23-MAR-13 DEFAULT SYSTEM
23-MAR-13 DEFAULT SYS
23-MAR-13 DEFAULT DOCTOR
23-MAR-13 DEFAULT SYSMAN
23-MAR-13 MONITORING_PROFILE DBSNMP
23-MAR-13 DEFAULT MGMT_VIEW
23-MAR-13 DEFAULT PATIENTS

7 rows selected.


SQL> alter profile default limit PASSWORD_LIFE_TIME UNLIMITED;

Profile altered.


Check status of SYS authentication

SQL> desc v$pwfile_users;
Name Null? Type
----------------------------------------- -------- ----------------------------
USERNAME VARCHAR2(30)
SYSDBA VARCHAR2(5)
SYSOPER VARCHAR2(5)
SYSASM VARCHAR2(5)


SQL> select * from v$pwfile_users;

USERNAME SYSDB SYSOP SYSAS
------------------------------ ----- ----- -----
SYS TRUE TRUE FALSE


change password of SYS

cd app\sam\product\11.2.0\dbhome_1\database

Orapwd file=filename password=my_password force=y


Kill a session

Sqlplus / as sysdba

select sid, username, serial# from v$session where username=’TOMMY’;

alter system kill session ’29,1020’ immediate;

or

ALTER SYSTEM KILL SESSION 'sid,serial#';

ALTER SYSTEM KILL SESSION 'sid,serial#' IMMEDIATE;

ALTER SYSTEM DISCONNECT SESSION 'sid,serial#' IMMEDIATE;


ENCRYPTION

setting up encryption wallet

CREATE TABLE tde_test (
id NUMBER(10),
data VARCHAR2(50)
);

INSERT INTO tde_test (id, data) VALUES (1, 'This is a secret!');
COMMIT;

location of wallet:
$ORACLE_BASE/admin/$ORACLE_SID/wallet

or change in sqlnet.ora

create a folder called wallet at "location_of_wallet"


ALTER SYSTEM SET ENCRYPTION KEY AUTHENTICATED BY "myPassword";

ALTER SYSTEM SET ENCRYPTION WALLET OPEN IDENTIFIED BY "myPassword";

ALTER SYSTEM SET ENCRYPTION WALLET CLOSE;


example.....


create folder wallet at

$ORACLE_BASE/admin/$ORACLE_SID


C:\Users\k>sqlplus / as sysdba

SQL*Plus: Release 11.2.0.1.0 Production on Sat Jun 29 09:54:05 2013

Copyright (c) 1982, 2010, Oracle. All rights reserved.


Connected to:
Oracle Database 11g Enterprise Edition Release 11.2.0.1.0 - 64bit Production
With the Partitioning, OLAP, Data Mining and Real Application Testing options

SQL> alter system set encryption key authenticated by "oracle";

System altered.


NOTE: you cannot encrypt SYS owned objects.

SQL> create table system.ide (id_num number(10), name varchar2(10));

Table created.

SQL> desc id;
Name Null? Type
----------------------------------------- -------- ---------------------------

ID_NUM NUMBER(10)
NAME VARCHAR2(10)


SQL> insert into system.ide values ('100', 'Ade');

1 row created.

SQL> insert into system.ide values ('102', 'car');

1 row created.

SQL> insert into system.ide values ('103', 'bus');

1 row created.

SQL> insert into system.ide values ('104', 'lorry');

1 row created.

SQL> insert into system.ide values ('105', 'bike');

1 row created.

SQL> commit;

Commit complete.


SQL> alter table system.ide modify id_name encrypt;

Table altered.

SQL> commit;

Commit complete.

SQL> select * from system.ide;

ID_NUM NAME
---------- ----------
100 Ade
102 car
103 bus
104 lorry
105 bike


SQL> alter system set encryption wallet close identified by "oracle";

System altered.

SQL> commit;

Commit complete.

SQL> select * from system.ide;
select * from system.ide
*
ERROR at line 1:
ORA-28365: wallet is not open


SQL> alter system set encryption wallet open identified by "oracle";

System altered.

SQL> select * from system.ide;

ID_NUM NAME
---------- ----------
100 Ade
102 car
103 bus
104 lorry
105 bike


Auditing

Disable auditing

export ORACLE_SID=orcl
sqlplus / as sysdba

noaudit all privileges;

noaudit all;

alter system set audit_trail=none scope=spfile;

truncate table sys.aud$;

commit;

shutdown immediate;

startup


Enable auditing

export ORACLE_SID=orcl
sqlplus / as sysdba


alter system set audit_trail='db','extended' scope=spfile;

alter system set audit_sys_operations=true scope=spfile;

commit;
shutdown immediate;
startup

audit session whenever successful;

audit session whenever not successful;

commit;

show parameter audit

select count(*) from sys.aud$;


SELECT * FROM DBA_STMT_AUDIT_OPTS;

SELECT * FROM DBA_PRIV_AUDIT_OPTS;

SELECT * FROM DBA_OBJ_AUDIT_OPTS;

audit ALTER any TABLE BY access;
audit CREATE any TABLE BY access;
audit DROP any TABLE BY access;
audit CREATE any PROCEDURE BY access;
audit DROP any PROCEDURE BY access;
audit ALTER any PROCEDURE BY access;
audit GRANT any privilege BY access;
audit GRANT any object privilege BY access;
audit GRANT any ROLE BY access;
audit audit system BY access;
audit CREATE external job BY access;
audit CREATE any job BY access;
audit CREATE any library BY access;
audit CREATE public DATABASE link BY access;
audit exempt access policy BY access;
audit ALTER USER BY access;
audit CREATE USER BY access;
audit ROLE BY access;
audit CREATE SESSION BY access;
audit DROP USER BY access;
audit ALTER DATABASE BY access;
audit ALTER system BY access;
audit ALTER profile BY access;
audit DROP profile BY access;
audit DATABASE link BY access;
audit system audit BY access;
audit profile BY access;
audit public synonym BY access;
audit system GRANT BY access;
audit DELETE ON sys.aud$;
audit ALTER ON DEFAULT;
audit GRANT ON DEFAULT;


Creating an audit cleaning job

Check if there is an existing job

SQL> col PARAMETER_NAME FOR a30
col PARAMETER_VALUE FOR a15
col AUDIT_TRAIL FOR a20
SELECT PARAMETER_NAME, PARAMETER_VALUE, AUDIT_TRAIL FROM DBA_AUDIT_MGMT_CONFIG_PARAMS WHERE audit_trail = 'STANDARD AUDIT TRAIL';


Drop existing job

BEGIN
DBMS_AUDIT_MGMT.DROP_PURGE_JOB(
AUDIT_TRAIL_PURGE_NAME => 'CLEANUP');
END;
/

Create new job

BEGIN
DBMS_SCHEDULER.CREATE_JOB (
job_name => 'DAILY_AUDIT_ARCHIVE_TIMESTAMP',
job_type => 'PLSQL_BLOCK',
job_action => 'BEGIN DBMS_AUDIT_MGMT.SET_LAST_ARCHIVE_TIMESTAMP(AUDIT_TRAIL_TYPE =>
DBMS_AUDIT_MGMT.AUDIT_TRAIL_AUD_STD,LAST_ARCHIVE_TIME => sysdate-2); END;',
start_date => sysdate,
repeat_interval => 'FREQ=HOURLY;INTERVAL=12',
enabled => TRUE,
comments => 'Create an archive timestamp'
);
END;
/

launch it

BEGIN
DBMS_AUDIT_MGMT.CREATE_PURGE_JOB(
AUDIT_TRAIL_TYPE => DBMS_AUDIT_MGMT.AUDIT_TRAIL_AUD_STD,
AUDIT_TRAIL_PURGE_INTERVAL => 12 /* hours */,
AUDIT_TRAIL_PURGE_NAME => 'Daily_Audit_Purge_Job',
USE_LAST_ARCH_TIMESTAMP => TRUE
);
END;
/
commit;


To verify job

SQL> col JOB_NAME FOR a30
col JOB_FREQUENCY FOR a40
SELECT JOB_NAME,JOB_STATUS,AUDIT_TRAIL,JOB_FREQUENCY FROM DBA_AUDIT_MGMT_CLEANUP_JOBS;


SQL> col next_run_date FOR a50
SELECT job_name, next_run_date, state, enabled FROM dba_scheduler_jobs
WHERE job_name LIKE '%AUDIT%';

Wednesday, August 21, 2013

Upgrading Oracle 10g XE to Oracle 11g XE

Task:

The task is to upgrade Oracle 10g XE to 11g XE to support our growing application. The application tracks patient information for a government agency. The growing data has been causing performance issue for the present 10g XE. So, management decided to upgrade for 3 reasons, namely:

1. Government requirement that databases for any of its agencies must be operating in 11g or above;
2. For better performance as 10g XE is already dragging due to the explosion of the data; and
3. Oracle will stop supporting 10g XE, so it makes sense to upgrade.

Hardware:

Operating system is Windows XP while database is Oracle 10g XE. Database has 2 main schemas (patient & Doctor). These schemas must be migrated to the new database (11g XE) with all the database objects intact.


Step-by-step guide to Upgrade
 
1. Export schemas

exp   system/*****   owner=patient    file=PATIENT.IMP

exp   system/*****   owner=doctor   file=DOCTOR.IMP


2. Uninstall ORACLE XE 10g

go to "control Panel"

uninstall Oraclexe 10g

Delete folder c:\oraclexe\.....\BIN  (If this was not deleted by the uninstall operation)

 
3. INSTALL ORACLE 11g

Click on "Next" to start the installation


Accept the Licensing agreement


Enter password for SYS and SYSTEM users


Choose the location of the binary files. Use "browse" to control location


Let the installer finish installation


4. Create tablespaces for the user accounts

create tablespace doctor
datafile 'C:\ORACLEXE\APP\ORACLE\ORADATA\XE\DOCTOR01.DBF' size 500m autoextend on next 50m maxsize unlimited;

create tablespace patient
datafile 'C:\ORACLEXE\APP\ORACLE\ORADATA\XE\PATIENT01.DBF' size 500m autoextend on next 50m maxsize unlimited;

create temporary tablespace doctortemp
tempfile 'C:\ORACLEXE\APP\ORACLE\ORADATA\XE\DOCTORTEMP01.DBF' size 100m autoextend on next 10m maxsize unlimited;

create temporary tablespace patienttemp
tempfile 'C:\ORACLEXE\APP\ORACLE\ORADATA\XE\PATIENTTEMP01.DBF' size 100m autoextend on next 10m maxsize unlimited;

commit;

5. Create user accounts 

create user doctor identified by "oracle23678"
default tablespace doctor
temporary tablespace doctortemp
quota unlimited on doctor;

create user patient identified by "oracle23679"
default tablespace patient
temporary tablespace patienttemp
quota unlimited on patient;
commit;

6. Grant privileges to user accounts  

grant create session to patient;
grant create any table to patient;
grant create any sequence to patient;
grant create any procedure to patient;
grant create any synonym to patient;
grant create any index to patient;
grant create any trigger to patient;

grant create session to doctor;
grant create any table to doctor;
grant create any sequence to doctor;
grant create any procedure to doctor;
grant create any synonym to doctor;
grant create any index to doctor;
grant create any trigger to doctor;

commit;

 
7. Change password settings
 
You may need to set password parameter since Oracle 10g XE is not case sensitive. Please note that this stage is optional in the upgrade process.
As SYS, run this command:

alter system set SEC_CASE_SENSITIVE_LOGON = FALSE;

commit;

 
8. Create user accounts 

Import schema into Oracle 11g XE by using the import command.

imp system/***** file=patient.dmp fromuser=patient touser=patient

imp system/***** file=doctor.dmp fromuser=doctor touser=doctor

 
Once the import is complete, check if the schema objects are correctly imported from the dumpfile. You will then need to take backup of your Oracle 11g XE database using RMAN or Export.

Thanks for reading.

EXP-00091 Exporting questionable statistics

Problem:

We were trying to upgrade from 10g to 11g. After running an export of the schemas from the 10g database, we installed Oracle 11g and tried to import the schema back into the new database (11g). Then we ran into error EXP-00091 Exporting questionable statistics.


Cause:

The "EXP-00091 Exporting questionable statistics" error occurs when a DBA tries to export table data with its related optimizer statistics, and Oracle cannot verify the currency of these statistics. Please note that Oracle has to verify statistics whenever it does an export; otherwise this error will be thrown.
DBMS_STATS controls this process. You can always skip and let Oracle handle the statistics after the data has been imported into the new database. This process is known as statistics recalculation.

Solution:

Run 'exp' with "statistics=none" option to skip the statistics collection and bypass the error. For instance:

exp scott/tiger file=scott.imp log=scott.log statistics=none

This will create a dumpfile with the name "scott.imp" and the statistics will be ignored.


Thursday, August 15, 2013

Datapump import/export

Datapump import/export are used for data migration. You can export TABLES, SCHEMA, TABLESPACE or DATABASE and restore it on another server.

Quickfacts:

1. Datapump produces a dumpfile with extention .dmp or .imp
2. Privilege 'exp_full_database' is required to export full database
3. Privilege 'imp_full_database' is required to import full database
4. In datapump, you can user a parfile to store your commands

Getting the help page

expdp help=y

Export: Release 10.1.0.2.0 - Production on Tuesday, 23 March, 2004 8:33

Copyright (c) 2003, Oracle.  All rights reserved.


The Data Pump export utility provides a mechanism for transferring data objects
between Oracle databases. The utility is invoked with the following command:

   Example: expdp scott/tiger DIRECTORY=dmpdir DUMPFILE=scott.dmp

You can control how Export runs by entering the 'expdp' command followed
by various parameters. To specify parameters, you use keywords:

   Format:  expdp KEYWORD=value or KEYWORD=(value1,value2,...,valueN)
   Example: expdp scott/tiger DUMPFILE=scott.dmp DIRECTORY=dmpdir SCHEMAS=scott
               or TABLES=(T1:P1,T1:P2), if T1 is partitioned table

USERID must be the first parameter on the command line.

Keyword               Description (Default)
------------------------------------------------------------------------------
ATTACH                Attach to existing job, e.g. ATTACH [=job name].
CONTENT               Specifies data to unload where the valid keywords are:
                      (ALL), DATA_ONLY, and METADATA_ONLY.
DIRECTORY             Directory object to be used for dumpfiles and logfiles.
DUMPFILE              List of destination dump files (expdat.dmp),
                      e.g. DUMPFILE=scott1.dmp, scott2.dmp, dmpdir:scott3.dmp.
ESTIMATE              Calculate job estimates where the valid keywords are:
                      (BLOCKS) and STATISTICS.
ESTIMATE_ONLY         Calculate job estimates without performing the export.
EXCLUDE               Exclude specific object types, e.g. EXCLUDE=TABLE:EMP.
FILESIZE              Specify the size of each dumpfile in units of bytes.
FLASHBACK_SCN         SCN used to set session snapshot back to.
FLASHBACK_TIME        Time used to get the SCN closest to the specified time.
FULL                  Export entire database (N).
HELP                  Display Help messages (N).
INCLUDE               Include specific object types, e.g. INCLUDE=TABLE_DATA.
JOB_NAME              Name of export job to create.
LOGFILE               Log file name (export.log).
NETWORK_LINK          Name of remote database link to the source system.
NOLOGFILE             Do not write logfile (N).
PARALLEL              Change the number of active workers for current job.
PARFILE               Specify parameter file.
QUERY                 Predicate clause used to export a subset of a table.
SCHEMAS               List of schemas to export (login schema).
STATUS                Frequency (secs) job status is to be monitored where
                      the default (0) will show new status when available.
TABLES                Identifies a list of tables to export - one schema only.
TABLESPACES           Identifies a list of tablespaces to export.
TRANSPORT_FULL_CHECK  Verify storage segments of all tables (N).
TRANSPORT_TABLESPACES List of tablespaces from which metadata will be unloaded.
VERSION               Version of objects to export where valid keywords are:
                      (COMPATIBLE), LATEST, or any valid database version.

expdp help=y
=====================================================================================
Export: Release 10.1.0.2.0 - Production on Tuesday, 23 March, 2004 8:33
Copyright (c) 2003, Oracle.  All rights reserved.

The Data Pump export utility provides a mechanism for transferring data objects
between Oracle databases. The utility is invoked with the following command:
   Example: expdp scott/tiger DIRECTORY=dmpdir DUMPFILE=scott.dmp
You can control how Export runs by entering the 'expdp' command followed
by various parameters. To specify parameters, you use keywords:
   Format:  expdp KEYWORD=value or KEYWORD=(value1,value2,...,valueN)
   Example: expdp scott/tiger DUMPFILE=scott.dmp DIRECTORY=dmpdir SCHEMAS=scott
               or TABLES=(T1:P1,T1:P2), if T1 is partitioned table
USERID must be the first parameter on the command line.
Keyword               Description (Default)
------------------------------------------------------------------------------
ATTACH                Attach to existing job, e.g. ATTACH [=job name].
CONTENT               Specifies data to unload where the valid keywords are:
                      (ALL), DATA_ONLY, and METADATA_ONLY.
DIRECTORY             Directory object to be used for dumpfiles and logfiles.
DUMPFILE              List of destination dump files (expdat.dmp),
                      e.g. DUMPFILE=scott1.dmp, scott2.dmp, dmpdir:scott3.dmp.
ESTIMATE              Calculate job estimates where the valid keywords are:
                      (BLOCKS) and STATISTICS.
ESTIMATE_ONLY         Calculate job estimates without performing the export.
EXCLUDE               Exclude specific object types, e.g. EXCLUDE=TABLE:EMP.
FILESIZE              Specify the size of each dumpfile in units of bytes.
FLASHBACK_SCN         SCN used to set session snapshot back to.
FLASHBACK_TIME        Time used to get the SCN closest to the specified time.
FULL                  Export entire database (N).
HELP                  Display Help messages (N).
INCLUDE               Include specific object types, e.g. INCLUDE=TABLE_DATA.
JOB_NAME              Name of export job to create.
LOGFILE               Log file name (export.log).
NETWORK_LINK          Name of remote database link to the source system.
NOLOGFILE             Do not write logfile (N).
PARALLEL              Change the number of active workers for current job.
PARFILE               Specify parameter file.
QUERY                 Predicate clause used to export a subset of a table.
SCHEMAS               List of schemas to export (login schema).
STATUS                Frequency (secs) job status is to be monitored where
                      the default (0) will show new status when available.
TABLES                Identifies a list of tables to export - one schema only.
TABLESPACES           Identifies a list of tablespaces to export.
TRANSPORT_FULL_CHECK  Verify storage segments of all tables (N).
TRANSPORT_TABLESPACES List of tablespaces from which metadata will be unloaded.
VERSION               Version of objects to export where valid keywords are:
                      (COMPATIBLE), LATEST, or any valid database version.
==============================================================================================

Example 1: Joe is a user on a database, Joe needs to export the whole database.
Solution:
c:\> sqlplus sys/**** as sysdba
     grant exp_full_database to joe;
     commit;
     exit;
c:\> expdp joe/**** full=y dumpfile=joe_database.dmp logfile=joe.log compression=n
^full database is exported
^Dumpfile will be created in the default location, which is 'c:\app\user\admin\orcl\dpdump'

Example 2: System needs to export Joe's schema with compression
Solution:
c:\> expdp system/**** full=n schemas=joe dumpfile=joe_schema.dmp logfile=joe1.log compression=y
^Joe's schema is exported
^Dumpfile will be created in the default location, which is 'c:\app\user\admin\orcl\dpdump'
^Dumpfile will be compressed

Example 3: Joe needs to export 2 tables (Student, Lecturer) to a location on disc ('c:\oracle')
Solution:
c:\> sqlplus joe/****
     create directory oracle as 'c:\oracle';
     commit;
     exit;
c:\> expdp joe/**** full=n tables=Student,Lecturer directory=oracle dumpfile=joe_tables.dmp logfile=joe2.log
^Joe's table are exported
^Dumpfile will be created in 'c:\oracle'
^There should be no space between the tables...e.g tables=(student1,student2,student3)

IMPORT

Example 4: Joe needs to import 2 tables (Student, Lecturer) from a directory called 'oracle'
Solution:
c:\> impdp joe/**** directory=oracle dumpfile=joe_tables.dmp tables=Student,Lecturer logfile=joe3.log
^Joe's table will be imported

Example 5: Joe needs to import 2 tables (Student, Lecturer) and change the tables name to 'student1' and 'student2'
Solution:
c:\> impdp joe/**** directory=oracle dumpfile=joe_tables.dmp logfile=joe3.log remap_table=joe.Student:student1,joe.Lecturer:student2
^Joe's table will be imported and renamed
^Tables must be separated by comma, the colon (:) must separate the oldname and new name

Example 6: System needs to import the whole database from a dumpfile on a flashdrive
Solution:
c:\> cd c:\app\user\admin\orcl\dpdump
Copy dumpfile to the folder
Launch impdp from this location
c:\app\user\admin\orcl\dpdump> impdp system/**** full=y dumpfile=database.dmp logfile=db.log

Example 7: System needs to import joe's schema from dumpfile (of full database) on a flashdrive
Solution:
c:\> cd c:\app\user\admin\orcl\dpdump
Copy dumpfile to the folder
Launch impdp from this location
c:\app\user\admin\orcl\dpdump> impdp system/**** full=n schemas=joe dumpfile=database.dmp logfile=db1.log
^Joe's schema will be imported


Example 8: System needs to import joe's schema and change name to DANIEL and also change the tablespace to daniel's tablespace
from dumpfile (of full database) on a flashdrive
Solution:
c:\> cd c:\app\user\admin\orcl\dpdump
Copy dumpfile to the folder
Launch impdp from this location
c:\app\user\admin\orcl\dpdump> impdp system/**** full=n dumpfile=database.dmp logfile=db2.log remap_schema=joe:daniel remap_tablespace=users:daniel_tbs
^Joe's schema will be imported and changed to Daniel
^Tablespace will be changed from users to Daniel_tbs
^you MUST physically create this tablespace and grant access to Daniel.

Example 9: System needs to import joe's schema using a parameter file
Solution:
create a parfile called 'joe.txt'
USERNAME=system/****
FULL=N
SCHEMA=(joe,daniel,class)
DIRECTORY=oracle
DUMPFILE=database.dmp
LOGFILE=db4.log
Save file and exit
c:\> impdp parfile=joe.txt

Parfile makes it more convenient to adjust datapump commands. It also help when you need to constantly run same commands.

Wednesday, August 14, 2013

Encrypting RMAN backup

Configuring encryption for Oracle Recovery Manager (RMAN) is always a good step in the right direction. There may be different reasons for encrypting RMAN backup.
  •  For greater security of data;
  • Customer requirement (e.g, most companies requires encryption for any database file containing SSN, Credit Card number, date of birth, etc); or
  • Complying with laws or regulations.
 
Option 1: Use global security wallet to encrypt backup

*configure the encryption wallet.

create a directory called "Wallet" in $ORACLE_BASE/admin/$ORACLE_SID

mkdir /home/oracle/app/oracle/admin/orcl/wallet
*Issue this command as SYS:
SQL> alter system set encryption key identified by "oracle1";
*Open the wallet:

SQL> alter system open encryption wallet identified by "oracle1";
*Log in to rman to encrypt backup

rman target /

RMAN> configure encryption for database on;

RMAN> backup database;


Option 2: Configure encryption right from RMAN

Another option is to configure encryption right from RMAN. You can also decide to use both options 1 and 2 together for double protection. Option one will be global because it controls every encryption done on the database including the backup. Option 2 is only restricted to RMAN prompt alone.

*Log in to RMAN and configure Encryption

RMAN target /

RMAN> set encryption on identified by "oracle1" only;

RMAN> backup database;

Note: You don't need a wallet to implement this. You can combine this with the global wallet transparent backup if you like. That will give you dual protection
You need to specify this password during recovery
  
Removing encryption
 
RMAN> configure encryption for database off;

Note: You need to set encryption off if at any point you don't need to encrypt your backup again. Some organizations will require you to remove encryption for data or databases that are only for TEST or DEVELOPMENT purpose.

Query encryption setting

Oracle provided a view to track encryption setting configured for recovery manager (RMAN). Issue this command as SYS:

select * from V$RMAN_ENCRYPTION_ALGORITHMS;

This is the view with all the details of rman encryption modes in the database. It is essential for a DBA to understand the encryption mode and their restrictions/limitations.

Thank you for reading.

Monday, July 8, 2013

Using SQLloader on Oracle 11g

I taught a session on SQLloader over the weekend, so I am going to post the highlights and the exercises I created for the students on this space.

What is Sqlloader?

It is a database tool for loading large volumes of data into the database. It is faster than using an insert and more reliable too. Also, it is free because it comes with the Oracle database utilities.

How to invoke Sqlloader

Lauch sqlloader using the command below:

sqlldr username/password control=controlfile

e.g

sqlldr system/**** control=my_control_file.ctl


Valid Keywords/arguments

    userid --     ORACLE username/password
   control --     control file name
       log --       log file name
       bad --      bad file name
      data --      data file name
   discard --    discard file name
discardmax -- number of discards to allow          (Default all)
      skip --      number of logical records to skip    (Default 0)
      load --      number of logical records to load    (Default all)
    errors --     number of errors to allow            (Default 50)
      rows --     number of rows in conventional path bind array or between direct path data saves
                      (Default: Conventional path 64, Direct path all)
  bindsize --   size of conventional path bind array in bytes  (Default 256000)
    silent --      suppress messages during run (header, errors, discards, partitions)
    direct --      use direct path                      (Default FALSE)
   parfile --      parameter file: name of file that contains parameter specifications


example 1: Use sqlloader to load data into table PERSON

log in as SYSTEM

SQL> create table PERSON
(SSN number(15),
National_ID number(15),
Last_name varchar2(30),
first_name varchar2(15),
sex char(1)
);

create a control file- "person_ctl.txt"

add this.....

LOAD DATA
  INFILE 'c:\person_data.txt'
  BADFILE 'c:\person_data_bad.txt'
  APPEND
  INTO TABLE PERSON
  FIELDS TERMINATED BY ","
  TRAILING NULLCOLS
( SSN,
National_ID,
Last_name,
first_name,
sex 
)

create an infile- "person_data.txt"

add this.....

77770101,7777801,JEFFEREY,KIDMAN,m
77770102,7777802,Clinton R,miller,m
77770103,7777803,ALLEN D,IVES,m
77770104,7777804,Matthew,MAXWELL,f
77770105,7777805,ANTHONY J,REISNER,m
77770106,7777806,CLINT A,KOCH,m
77770107,7777807,ORLANDO,Desantis,m
77770108,7777808,JUAN C,ZIMMERMAN,m
77770109,7777809,STEVE J,EVANS,m
77770110,7777810,Robert D,DAVIS,m
77770111,7777811,Michael,McClendon,m
77770112,7777812,JONATHAN,CONGER,m
77770113,7777813,DAVID F,LOVITT,m
77770114,7777814,Ernesto,FLESHMAN,m
77770115,7777815,Joshua B,pierce,m
77770116,7777816,Justin,OLIVER,m
77770117,7777817,TODD J,Jacobs,m
77770118,7777818,Conner,BROWN,m
77770119,7777819,Dewey,WOOD,m
77770120,7777820,FRANK C,ARAUJO,m
77770121,7777821,SCOTT A,OBYRNE,m
77770122,7777822,JESSE W,HARDIN,m
77770123,7777823,MATTHEW D,CASTOR,m
77770124,7777824,JOSHUA,ANDREWS,m
77770125,7777825,JUSTIN B,Depew,m
77770126,7777826,MATTHEW F,FORST,m
77770127,7777827,ALFONSO L,OGBORN,m
77770128,7777828,COREY J,DINOFF,m
77770129,7777829,CHRISTOPHER J,COMETA,m
77770130,7777830,PEDRO L,WEBB,m
77770131,7777831,ZACHERY R,GUTIERREZ,m
77770132,7777832,George,SAIKU,m
77770133,7777833,WILLIAM P,FISHER,m
77770134,7777834,ANTHONY R,STOWBUNKO,m
77770135,7777835,Terry,GILCHRIST,m
77770136,7777836,ERIC M,LEE,m
77770137,7777837,CHARLES W,MONTGOMERY,m
77770138,7777838,CHRISTOPHER S,SZOKE,m
77770139,7777839,RANDALL J,Konig,m
77770140,7777840,Robert E,TURNBOW,m
77770141,7777841,JUSTIN R,GUTIERREZ,m
77770142,7777842,NICHOLAS P,klein,m
77770143,7777843,ROBERT W,ALLEY,m
77770144,7777844,PAUL D,SANTOCONO,m
77770145,7777845,KORY J,GOMEZ,m
77770146,7777846,WALTER T,STEADMAN,m
77770147,7777847,JOSHUA D,Martin,m
77770148,7777848,CHAN P,GWIZDAK,m
77770149,7777849,CHRISTOPHER W,OKKEN,m
77770150,7777850,NAQUAN D,CARMICHAEL,m


Launch sqlloader from c:\


c:\> sqlldr system/**** control=person_ctl.txt


example 2: Use sqlloader to load data into table SCHOOL

log in as SYSTEM

SQL> create table SCHOOL
(SCH_ID number(15),
SSN number(15),
state_id number(7),
county_id number(7),
county number(7),
state char(2)
);

create a control file- "sch_ctl.txt"

add this.....

LOAD DATA
  INFILE 'c:\sch_data.txt'
  BADFILE 'c:\sch_data_bad.txt'
  APPEND
  INTO TABLE PERSON
  FIELDS TERMINATED BY ","
  TRAILING NULLCOLS
( SCH_ID,
SSN,
state_id,
county_id,
county,
state
)

create an infile- "sch_data.txt"

add this.....

7777801,77770101,262,2020,2020,ga
7777802,77770102,262,2020,2020,ma
7777803,77770103,262,2020,2020,la
7777804,77770104,262,2020,2020,tx
7777805,77770105,262,2020,2020,md
7777806,77770106,262,2020,2020,mi
7777807,77770107,262,2020,2020,mo
7777808,77770108,262,2020,2020,mo
7777809,77770109,262,2020,2020,mi
7777810,77770110,262,2020,2020,tx
7777811,77770111,262,2020,2020,tx
7777812,77770112,262,2020,2020,tx
7777813,77770113,262,2020,2020,md
7777814,77770114,262,2020,2020,md
7777815,77770115,262,2020,2020,sd
7777816,77770116,262,2020,2020,id
7777817,77770117,262,2020,2020,mi
7777818,77770118,262,2020,2020,dc
7777819,77770119,262,2020,2020,dc
7777820,77770120,262,2020,2020,dc
7777821,77770121,262,2020,2020,dc
7777822,77770122,262,2020,2020,dc
7777823,77770123,262,2020,2020,dc
7777824,77770124,262,2020,2020,mi
7777825,77770125,262,2020,2020,dc
7777826,77770126,262,2020,2020,md
7777827,77770127,262,2020,2020,ms
7777828,77770128,262,2020,2020,tn
7777829,77770129,262,2020,2020,tx
7777830,77770130,262,2020,2020,oh
7777831,77770131,262,2020,2020,mi
7777832,77770132,262,2020,2020,az
7777833,77770133,262,2020,2020,ca
7777834,77770134,262,2020,2020,oh
7777835,77770135,262,2020,2020,ga
7777836,77770136,262,2020,2020,ny
7777837,77770137,262,2020,2020,ny
7777838,77770138,262,2020,2020,nj
7777839,77770139,262,2020,2020,nj
7777840,77770140,262,2020,2020,pa


Launch sqlloader from c:\


c:\> sqlldr system/**** control=sch_ctl.txt

NOTE:

To avoid errors, launch SQLldr from the path where your control file is located,
e.g if your control file is c:\database\control1.ctl, then run sqlldr from 'c:\database'

Monday, July 1, 2013

Datapump in Oracle 11g

Datapump import/export are used for data migration. You can export TABLES, SCHEMA, TABLESPACE or DATABASE and restore it on another server.

Quickfacts:

1. Datapump produces a dumpfile with extention .dmp or .imp
2. Privilege 'exp_full_database' is required to export full database
3. Privilege 'imp_full_database' is required to impport full database
4. In datapump, you can user a parfile to store your commands

Getting the help page

expdp help=y

Keyword                                  Description
------------------------------------------------------------------------------
DIRECTORY                          Directory object to be used for dumpfiles and logfiles.
DUMPFILE                             List of destination dump files (expdat.dmp),
                                                 e.g. DUMPFILE=scott1.dmp, scott2.dmp, dmpdir:scott3.dmp.
EXCLUDE                              Exclude specific object types, e.g. EXCLUDE=TABLE:EMP.
FULL                                       Export entire database (N).
HELP                                       Display Help messages (N).
INCLUDE                                Include specific object types, e.g. INCLUDE=TABLE_DATA.
JOB_NAME                            Name of export job to create.
LOGFILE                                 Log file name (export.log).
NETWORK_LINK                  Name of remote database link to the source system.
NOLOGFILE                           Do not write logfile (N).
PARALLEL                             Change the number of active workers for current job.
PARFILE                                 Specify parameter file.
SCHEMAS                              List of schemas to export (login schema).
TABLES                                  Identifies a list of tables to export - one schema only.
TABLESPACES                     Identifies a list of tablespaces to export.
VERSION                              Version of objects to export where valid keywords are:
                                                (COMPATIBLE), LATEST, or any valid database version.
EXPORT

Example 1: Joe is a user on a database, Joe needs to export the whole database.
Solution:
c:\> sqlplus sys/**** as sysdba
     grant exp_full_database to joe;
     commit;
     exit;
c:\> expdp joe/**** full=y dumpfile=joe_database.dmp logfile=joe.log compression=n

^full database is exported
^Dumpfile will be created in the default location, which is 'c:\app\user\admin\orcl\dpdump'


Example 2: System needs to export Joe's schema with compression
Solution:
c:\> expdp system/**** full=n schemas=joe dumpfile=joe_schema.dmp logfile=joe1.log compression=y

^Joe's schema is exported
^Dumpfile will be created in the default location, which is 'c:\app\user\admin\orcl\dpdump'
^Dumpfile will be compressed


Example 3: Joe needs to export 2 tables (Student, Lecturer) to a location on disc ('c:\oracle')
Solution:
c:\> sqlplus joe/****
     create directory oracle as 'c:\oracle';
     commit;
     exit;
c:\> expdp joe/**** full=n tables=Student,Lecturer directory=oracle dumpfile=joe_tables.dmp logfile=joe2.log

^Joe's table are exported
^Dumpfile will be created in 'c:\oracle'
^There should be no space between the tables...e.g tables=(student1,student2,student3)


IMPORT

Example 4: Joe needs to import 2 tables (Student, Lecturer) from a directory called 'oracle'
Solution:
c:\> impdp joe/**** directory=oracle dumpfile=joe_tables.dmp tables=Student,Lecturer logfile=joe3.log

^Joe's table will be imported

Example 5: Joe needs to import 2 tables (Student, Lecturer) and change the tables name to 'student1' and 'student2'
Solution:
c:\> impdp joe/**** directory=oracle dumpfile=joe_tables.dmp logfile=joe3.log remap_table=joe.Student:student1,joe.Lecturer:student2

^Joe's table will be imported and renamed
^Tables must be separated by comma, the colon (:) must separate the oldname and new name


Example 6: System needs to import the whole database from a dumpfile on a flashdrive
Solution:
c:\> cd c:\app\user\admin\orcl\dpdump
Copy dumpfile to the folder
Launch impdp from this location
c:\app\user\admin\orcl\dpdump> impdp system/**** full=y dumpfile=database.dmp logfile=db.log

Example 7: System needs to import joe's schema from dumpfile (of full database) on a flashdrive
Solution:
c:\> cd c:\app\user\admin\orcl\dpdump
Copy dumpfile to the folder
Launch impdp from this location
c:\app\user\admin\orcl\dpdump> impdp system/**** full=n schemas=joe dumpfile=database.dmp logfile=db1.log

^Joe's schema will be imported


Example 8: System needs to import joe's schema and change name to DANIEL and also change the tablespace to daniel's tablespace
from dumpfile (of full database) on a flashdrive
Solution:
c:\> cd c:\app\user\admin\orcl\dpdump
Copy dumpfile to the folder
Launch impdp from this location
c:\app\user\admin\orcl\dpdump> impdp system/**** full=n dumpfile=database.dmp logfile=db2.log remap_schema=joe:daniel remap_tablespace=users:daniel_tbs

^Joe's schema will be imported and changed to Daniel
^Tablespace will be changed from users to Daniel_tbs
^you MUST physically create this tablespace and grant access to Daniel.


Example 9: System needs to import joe's schema using a parameter file
Solution:

create a parfile called 'joe.txt'

USERNAME=system/****
FULL=N
SCHEMA=(joe,daniel,class)
DIRECTORY=oracle
DUMPFILE=database.dmp
LOGFILE=db4.log


Save file and exit

c:\> impdp parfile=joe.txt

Parfile makes it more convenient to adjust datapump commands. It also help when you need to constantly run same commands.

Example 10: System needs to import joe's schema from dumpfile and replace all tables
Solution:
c:\> impdp system/**** full=n schemas=joe dumpfile=database.dmp logfile=db6.log table_exists_action=replace

^Joe's schema will be imported
^Joe's tables will be replaced if they already exist on the database prior to import

Friday, June 28, 2013

Granting access to another database schema

There would be situations where you need to grant access to another schema in the database to manage or read from a table/view/trigger/index/synonym/sequence, etc.

The first rule to note is that whoever creates a table is the owner of that database object. For instance, if a UserA creates a table, UserA is the owner of that object. Thus, UserB cannot access the object except granted access on it or if such user has DBA privilege.

Type of access on database objects

These are the types of privileges you can grant a database schema on any database object. For instance, UserA can grant all these privileges to UserB (with admin option).

ALTER  
DELETE
INDEX
INSERT
UPDATE
SELECT
REFERENCES
ON COMMIT REFRESH
QUERY REWRITE
DEBUG
FLASHBACK

You can also grant privilege WITH GRANT OPTION. With grant option empowers the user to also transfer the privilege or grant same privilege to another user in the database. 

Where to confirm ownership

To check ownership of database objects, you need to query data dictionary views that store information about database objects. The key one are:

DBA_TABLES
DBA_VIEWS
DBA_SYNONYMS
ALL_TABLES
ALL_VIEWS
ALL_SYNONYMS
USER_TABLES
USER_VIEWS
USER_SYNONYMS

All objects starting with 'DBA_' are all objects in the database. Objects starting with 'ALL_' are objects a particular schema has privilege on while those starting with 'USER_' are those the particular user owns.

How to grant access

In order to allow read only access on tables, issue this command:
 

SQL> grant select on  pharmacist.license to  nurse;

Granting access to all database objects for another schema

Yes, it is possible to grant access to all tables owned by a certain user to another database schema. You can run a script to pull all the tables and grant the privilege immediately. Use the script below and adjust the schema name as appropriate.

Generating a script to grant readonly access to another database schema 

set heading off
set pagesize 1000
set feedback off


spool grant_select_table.sql
select 'GRANT SELECT ON '||table_name||' TO NURSE;' from user_tables;
spool off


spool grant_select_views.sql
select 'GRANT SELECT ON '||view_name||' TO NURSE;' from user_views;
spool off


select view_name from dba_views where owner='PHARMACIST';

[oracle@ ~]$ sqlplus / as sysdba
SQL*Plus: Release 11.2.0.1.0 Production on Thu Jun 27 14:06:36 2013
Copyright (c) 1982, 2009, Oracle.  All rights reserved.
Enter password:
Connected to:
Oracle Database 11g Enterprise Edition Release 11.2.0.1.0 - 64bit Production
With the Partitioning, OLAP, Data Mining and Real Application Testing options

SQL> @grant_select_table.sql
SQL> @grant_select_view.sql

connect NURSE/****@patients

SQL> select count(*) from pharmacist.license;
COUNT(*)
----------
     10512

SQL> select count(*) from pharmacist.note;
COUNT(*)
----------
     25828

After running the script, Nurse can now select on pharmacist's tables and views. 

Wednesday, June 12, 2013

ORA-24247: network access denied by access control list (ACL) 

Error likes "*Cause: The UTL_HTTP package failed to execute the HTTP request" are very common with Oracle 11g and older versions of Oracle database. The problem is that PL/SQL packages: UTL_TCP, UTL_HTTP, UTL_SMTP, UTL_MAIL, and UTL_INADDR cannot be executed by the current user. 


Applications rely on database schemas to execute functions. For example, using internet maps to determine location in an application requires an external connection to another webpage. This is why the invoker of those packages needs additional privileges to connect to an external host or to resolve the name or the IP address of a host. 

This is how the process works: The packages check the invoker for the necessary privileges only when the calls are made at runtime and raises an exception if the invoker lacks the privileges. 

In Oracle 11.2.0.3.6, this problem was solved. Prior releases of Oracle requires XML DB to be installed and Configured a network Access Control Lists (ACLs) in the database before these packages can work.

What is an ACL? An ACL is a network access control list that enables a DBA control access to external connection through the host. Using an ACL is common in production databases when issues with Network Access like ORA-24247 arises.


Environment
Linux 5.4
Oracle 11.2.0.3.0 (Production)

Cause
Privilege to UTL_http  should have been granted to specific user or schema that will be using the external connection. Though this can be given through patches/updates, it is highly recommended to reduce host vulnerability to manually assign privilege through ACL.
If schema has access to objects after Oracle patch was installed, this is/could be a problem when installed on the production server because accounts that should not have access to this and other objects will have access to things  they are not supposed to.

Solution
Verify that the Port is open
You need to verify that your port is open and can connect externally and also download webpages. Use these commands:

login as user "Oracle" (OS environment)

wget http://maps.google.com/
or
wget -r -l 0 http://maps.google.com/

If you get a response, then your port is open and ready for connection.

Create the user requiring access
Run these commands to create the users needed:

create tablespace patients 
datafile '/home/oracle/app/oracle/oradata/patients/datafile/patients01.dbf' size 50m reuse autoextend on maxsize unlimited;

create smallfile temporary tablespace patientstemp tempfile '/home/oracle/app/oracle/oradata/patients/datafile/patientstemp01.dbf' size 5m autoextend on next 2048k maxsize 1024m extent management local uniform size 1m;

create user patients profile "default" identified by "patients"
default tablespace patients
temporary tablespace patientstemp
quota unlimited on patients account unlock;

grant create session to patients;
grant connect to patients;
grant create trigger to patients;
grant create view to patients;
grant create procedure to patients;
grant create sequence to patients;
grant create table to patients;
grant create synonym to patients;

Run script to create ACL
The script will first drop any existing ACL before creating a new one. This is necessary to reduce or eliminate conflicts.

begin
        DBMS_NETWORK_ACL_ADMIN.DROP_ACL(acl => 'utl_http.xml');
end;
/
commit;
BEGIN
  DBMS_NETWORK_ACL_ADMIN.CREATE_ACL(acl         => 'utl_http.xml',
                                    description => 'geo code ACL',
                                    principal   => 'PATIENTS',
                                    is_grant    => true,
                                    privilege   => 'connect');
  DBMS_NETWORK_ACL_ADMIN.ADD_PRIVILEGE(acl       => 'utl_http.xml',
                                       principal => 'PATIENTS',
                                       is_grant  => true,
                                       privilege => 'resolve');

  DBMS_NETWORK_ACL_ADMIN.ASSIGN_ACL(acl  => 'utl_http.xml',
                                    host => 'your_ip_address');
END;
/
COMMIT;

Grant access to user
as user "SYS" run this command

grant execute on utl_http to PATIENTS;

grant execute on DBMS_NETWORK_ACL_ADMIN to PATIENTS;

Assign ACL to networks (in this order)

SQL> BEGIN
  DBMS_NETWORK_ACL_ADMIN.ASSIGN_ACL(acl  => 'utl_http.xml', host => 'maps.google.com');
  END;
   /

SQL> BEGIN
 DBMS_NETWORK_ACL_ADMIN.ASSIGN_ACL(acl  => 'utl_http.xml', host => 'local.yahooapis.com');
 END;
  /

Verify the ACL

SELECT acl from dba_network_acl_privileges;
/sys/acls/utl_http.xml

SELECT host, lower_port, upper_port, acl FROM   dba_network_acls;

Desc   dba_network_acls;
 Name                                      Null?    Type
 ----------------------------------------- -------- ----------------------------
 HOST                                      NOT NULL VARCHAR2(1000)
 LOWER_PORT                       NUMBER(5)
 UPPER_PORT                         NUMBER(5)
 ACL                                         VARCHAR2(4000)
 ACLID                                     NOT NULL RAW(16)


Verify permission
Run this script as user "SYS" to verify if the permission to connect externally has been granted to the user - patients:

SELECT acl, principal, privilege, is_grant, 
TO_CHAR(start_date, 'DD-MON-YYYY') AS start_date, TO_CHAR(end_date, 'DD-MON-YYYY') AS end_date FROM   dba_network_acl_privileges;

SQL> SELECT DECODE(
  2  DBMS_NETWORK_ACL_ADMIN.check_privilege('/sys/acls/utl_http.xml', 'PATIENTS', 'connect'),
  3  1, 'GRANTED', 0, 'DENIED', NULL) privilege
  4  from dual;
PRIVILE
-------
GRANTED


Check that it can connect
Run this script as user "SYS" to verify if the permission to connect externally has been granted to the user - patients:

SQL> DECLARE
  2  l_url            VARCHAR2(50) := 'http://maps.google.com';
  3  l_http_request   UTL_HTTP.req;
  4   l_http_response  UTL_HTTP.resp;
  5   BEGIN
  6  l_http_request  := UTL_HTTP.begin_request(l_url);
  7  l_http_response := UTL_HTTP.get_response(l_http_request);
  8  UTL_HTTP.end_response(l_http_response);
  9   END;
10  /

I hope this helps. Please drop your comments or/and questions.

Pix credit: Oracle, NetworkDigest